I feel I’ve never told you the story of my truck. Poppins, of whom I never boast, is the name of my pick-up that I converted into our home on wheels. It’s about time the old girl gets a little spotlight here on the website. We got on the road during July of 2017 and as I am writing this we are just eclipsing the 9-month mark of our journey. It’s been a wonderful trip so far, and Poppins has been an absolute champ. First things first, to really know who she is, you need to know the origin of the name.
The Name
It was late summer of 2014 and we were making the voyage from San Diego up to the Black Rock Desert of northern Nevada for what would be my second trip to Burning Man. We were towing a trailer and I had the standard camper shell on the back of the truck at the time. It was me, Lindsey, and our good friends Tom and Emily, and seemingly every crack and crevice was stuffed to the gills when we left SD. On the way, we had to make a few different stops; each one resulting in us having to pack more shit into the truck than we had planned for.
All told, I believe we made 4 stops, and each time we somehow found a way to get our stuff loaded. Whether it was piles of groceries, 13 five-gallon water jugs, or other random crap, every time we stopped more space seemed to appear. It was as if the truck knew and magically made room. It was a lot like Mary Poppins’ small bag that held a coat rack, a bird cage, and tons of other sizable items that clearly could not fit into a handbag. Once we made it to the Burn, it was clear the truck needed a Playa name like everyone else, so from that point forward, she has been known as Mary Poppins, or Poppins for short.
The Truck & Camper Shell
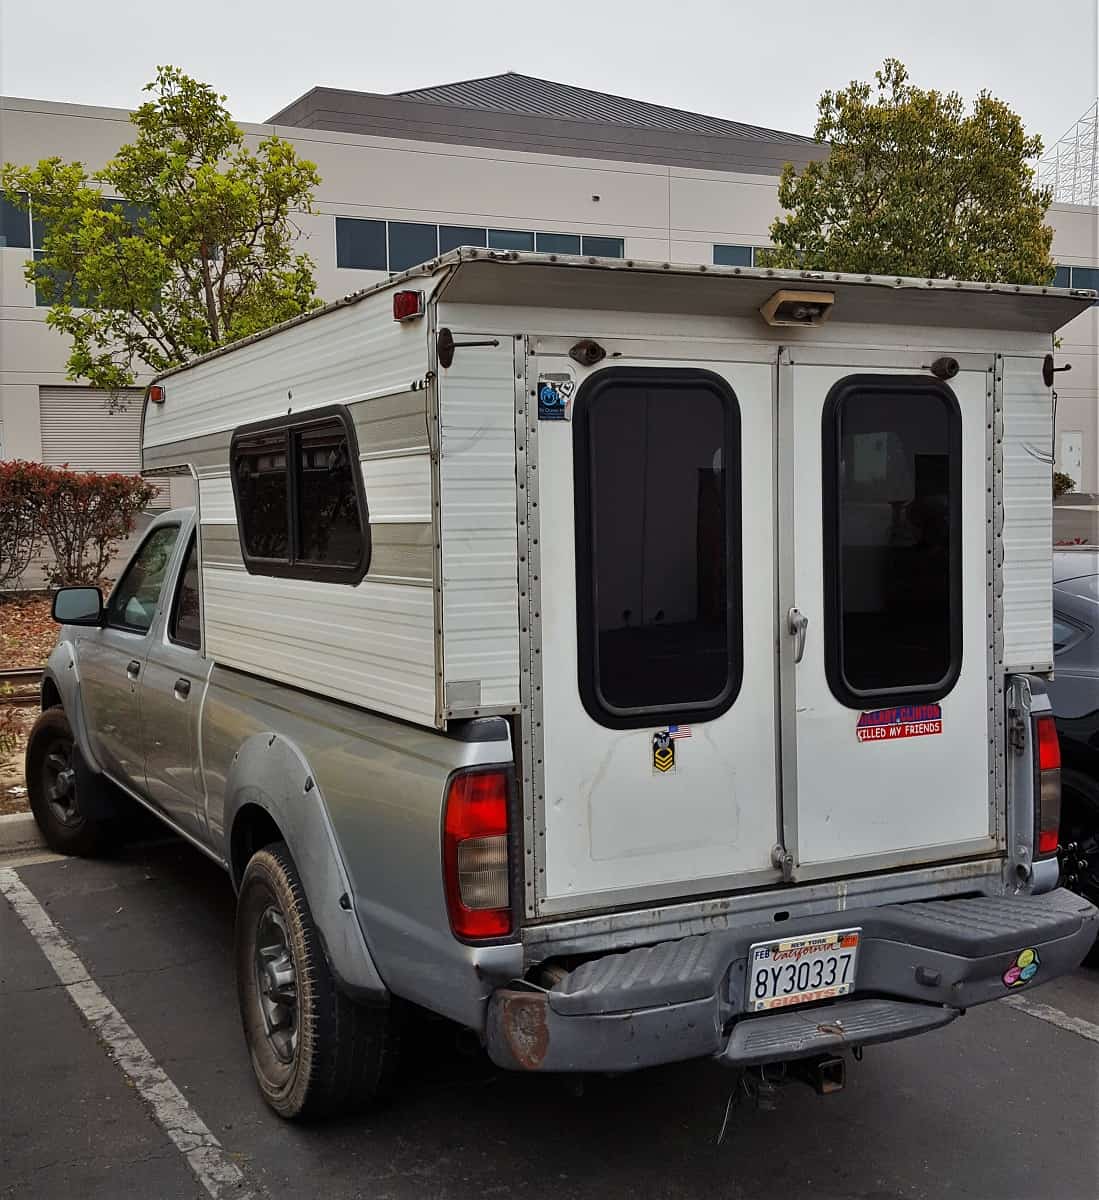
Now that you know how she was named, let’s talk about who she really is. Poppins is a 2002 Nissan Frontier XE King Cab. She has 4 doors, automatic transmission with 2-wheel drive, and a 6-cylinder engine. I purchased the truck in 2008 with 76,000 miles, and during the 9 years I lived in San Diego I piled 91,000 more onto that. Upon leaving SD in July 2018, she had just surpassed 167,000.
When we decided to travel by vehicle, my first thought was to build a living space under the standard camper shell I had for the truck. When things got more serious and I put some thought into it, it was clear we would need more than just that, so I began searching for a camper that could work for my truck bed.
I learned quickly that I was limited in what I could do since Poppins is only a midsize pickup and doesn’t have much dead load capacity. I searched around for a pop-up camper that could sit in the bed of the truck, but found that all the older models, which are hard to find as it is, were too heavy for smaller pickups. The only ones that could work with the weight limits Poppins has are the newer models built from aluminum. Unfortunately, with those models, even the cheapest ones were far out of my budget, so my option now was to find a larger shell that I could build out myself.
I researched what was out there to see what my options were, and found again that I was limited. After searching used lots throughout San Diego and scouring eBay and craigslist for a couple weeks, I finally found the perfect fit. It was a Callen Camper shell circa 1989 or so, complete with insulated walls, interior wood paneling, side windows, 2 cabin lights, a ceiling vent, and storage space that hangs over the cab of the truck. It only weighed 400 lbs. which was well within the load capacity for the truck, but once built out and filled with all our stuff, we would be pushing the limit, so I added airbags to the rear suspension to give her the extra support she needed. Physically, the shell fit the bed of the truck perfectly, all I needed to do was add a little spray foam to fill in the cracks to keep bugs out and we were all set. Next thing to do was turn it into our new home, tricky part was I only had 2 weeks to get it all done.
Building the Camper
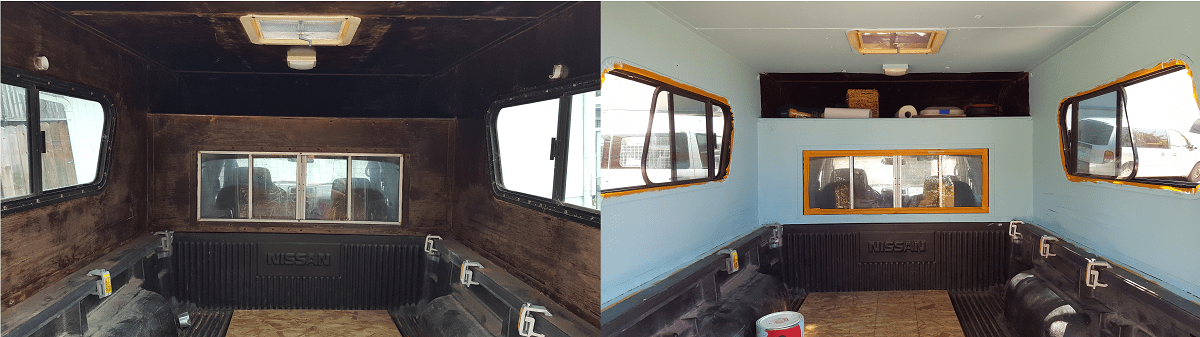
Step one was the interior walls. The wood was a bit old and beat up, so we decided it would look best painted. I didn’t want to half ass it, so I borrowed a sander and got to work. For the most part the sanding wasn’t too bad, but the ceiling was no joke. Ever try sanding the ceiling of a small room that you can’t stand up in? Not the most fun part of it all, that’s for sure. After sanding, priming, and two coats of paint, it looked like a whole new camper shell.
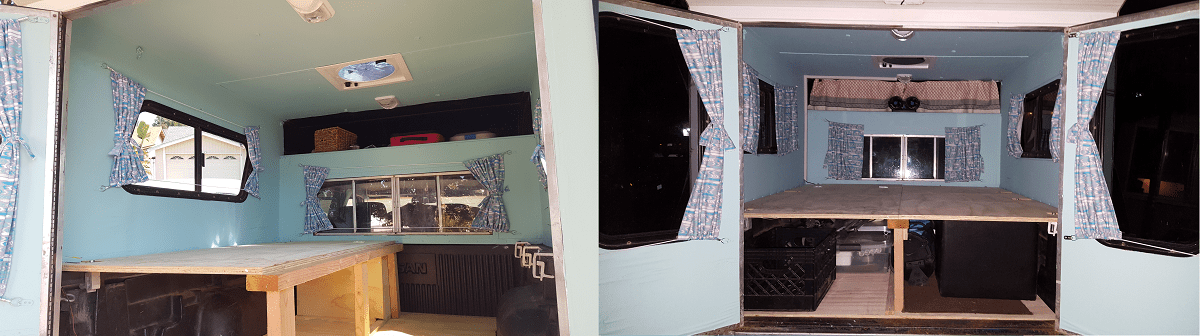
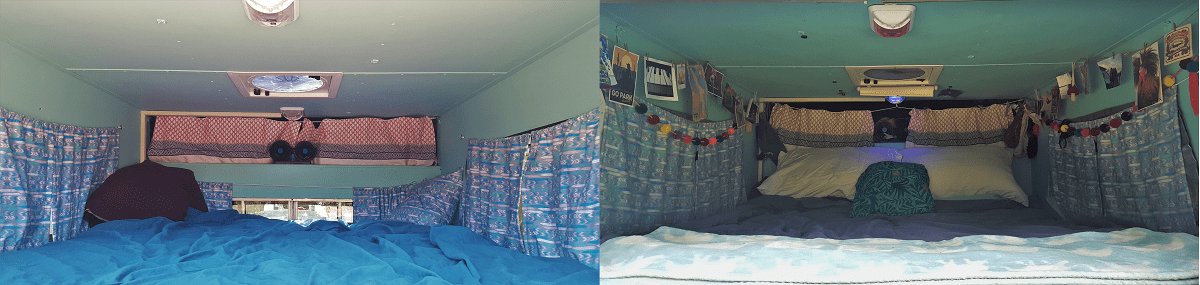
Once the paint was dry I began building out the interior. I had done some internet searching for ideas and came up with a game plan for the space I had. The idea was to lay the bed flat across the top of the walls of the pickup bed, giving us about a 1-1/2 feet of storage space below the bed, and about 3 feet of space for the “bedroom” above. All I needed was few 2×4’s along with some high-quality plywood for the floor and bed.
First, I cut the plywood to fit the floor of the pickup bed and around the wheel wells so I would have something to screw into. I then built a support down the middle of the bed of the truck to mount the plywood on for the bed. I decided to cut the plywood for the bed down the middle and put one side on hinges. That way I would have the ability of converting our bedroom into a living room, or turning the bed into a couch.
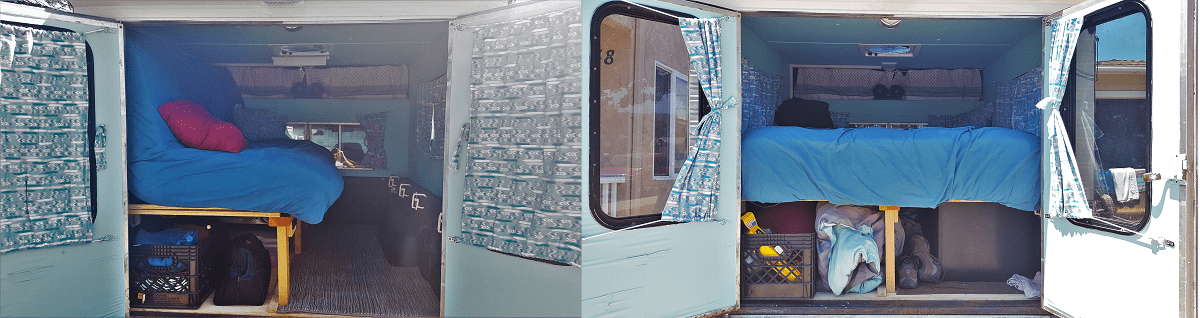
For the mattress, I decided to get a futon mattress so I could do the conversion, but didn’t want your typical uncomfortable futon pad. My other challenge was to find something that would fit the specific space I had. With some help from a friend, I found The Foam Factory online and was able to source an incredibly comfortable bed. Originally, I had planned to get a customer sized mattress made (which they do at The Foam Factory), but turned out the Futon mattress they sold was almost the exact dimensions I needed. It was a couple inches long, but the doors of the camper would still close, and a few inches short on the width, but that gave us some much-needed space for things on the sides of the bed. With the addition of a 1-1/2” memory foam pad on top, this bed is just as, if not more comfortable then our old bed at home!
For the windows, Lindsey found some fabric and put her sewing skills to good use. She used one layer of decorative fabric for a nice homey feel, and sewed that on top of thick, opaque fabric to create a nice dark space for our new bedroom. Between our blackout curtains and comfy bed, we find ourselves sleeping like babies.
Electrical & Solar System
Luckily, the Callen Camper had some basic electrical already wired in for lights. There were 2 cabin lights inside, one area light off the back, and running lights for the outside. Step one, I replaced all the old fixtures with new, high efficiency LED light fixtures. On top of that, I removed the existing ceiling vent and replaced it with a Fan-Tastic ceiling fan that can-do intake and exhaust (which is extremely important considering all the beans we’d be eating in Mexico). I also added a dual headed fan at the head of the bed so we could each have air blowing on us on those hot nights. Lastly, I installed a DC outlet and USB port so we could charge our electronics in the camper and not rely on the car battery.
For power, the running lights needed to get wired into the trucks lighting system which was easy enough. Those are the only electronics that run off the car battery, all the rest is powered by the solar system and battery bank I installed. I built a small enclosure in the back corner of the pickup, underneath the bed, to store the batteries and fuse panel for all the electrical connections. This way it’s all tucked away and protected from all the random shit we stuff under the bed in our storage space.
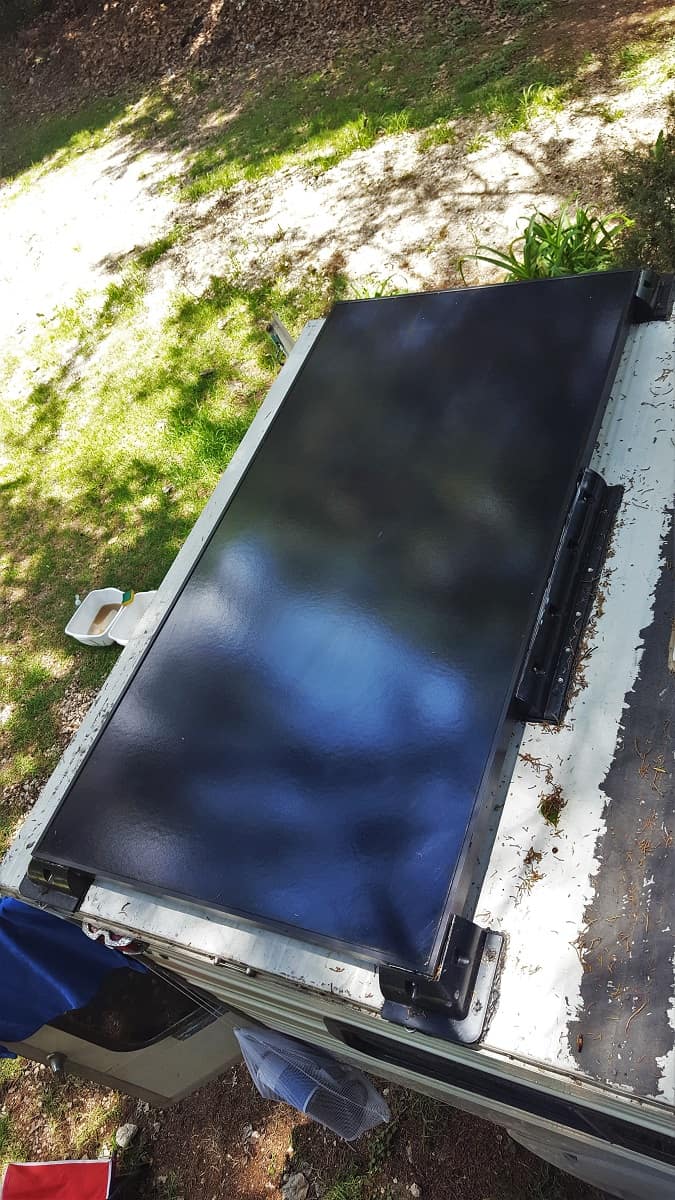
As for the solar system, I had to find the right module for the roof since I was limited on space. Your standard 72-cell photovoltaic module installed these days are just slightly too large for my roof space. I needed something a couple inches shorter, but with comparable power output. Luckily, I worked for a solar company and I was able to find an old SunPower 205-watt module with the dimensions I needed in our warehouse. It was an old display module, and since we didn’t install this particular type anymore, the owner of the company was gracious enough to donate it to my new home.
To mount it, the camper didn’t really have a sufficient frame that I could secure mounting brackets to without some serious carpentry work, so I used drill-free solar panel mounting brackets that I found on Amazon. There are many similar brands that all seem solid, but I used Instapark ZJ-03 Universal Brackets, coupled with Sikaflex Polyurethane adhesive to secure everything down. The thought of not putting penetrations in the roof of the camper was nice, considering a leak would really suck, but the thought of my solar panel flying off my truck while driving in Guatemala made me a bit uneasy, so I decided to throw in a few Tek screws for good measure. I only screwed the brackets to the roof because I didn’t want to void the module warranty by drilling holes in the frame of the module itself. Based on my research of the Sikaflex adhesive and reviews I read online, I felt comfortable with that being the soul connection of the module to the mounting brackets. Only time would tell if that was the right decision or not…
For the battery bank, I opted for two AGM 105 AH batteries. It was the more expensive option, but when it comes to the type of system I was building, AGM is a far better battery technology than your standard lead-acid options. Beyond efficiency and lifespan, I really needed something maintenance free, and that had minimum emissions since it would be stored under where we sleep. Size wise, one would have been plenty for the lights, fans, and outlets, but I ended up purchasing an air-conditioned cooler that ran on 12V and sucked energy. With 210 AH’s of capacity, I can leave the cooler on overnight without totally draining the batteries. And as for recharging, the SunPower module kicks ass and can charge both batteries from dead to 100% in 3-4 hours or so, with good sunlight.
To connect the module to the battery bank, I purchased a Victron BlueSolar MPPT Charge Controller for under $100 online. When designing an off-grid system, it’s important to get a quality charge controller to ensure your batteries have proper protection as well as operate at the highest efficiency. The Morning Star company is one of the best options for these smaller off-grid systems, but Victron is a comparable product and is less than half the cost, so I opted to take a chance and save some money. So far, it has worked great.
I wired the module and battery bank into their specific terminals on charge controller, then fed power from the controller over to a small fused circuit panel. Both the fans, the outlet, and the lights all land on their own fused terminals, so if any one of them shorts out, the rest of the system will be protected. Our home was built out and fully self-sustaining, now it was time for the details.
The Details & The Extras
Considering I had to get this all done in 2 weeks, getting the core built was the number one priority before taking off. Once that was done, we got to focus on the finer details of our new living space. I bought some multi-color gel tabs online and cut them to fit our interior lighting fixtures, so now we can change the lights from blinding white, to whatever color mood we may be in. Didn’t take long for Lindsey to add her personal touch by hanging some string along the sides to hang pictures and art from. It’s funny how such simple things can transform a bland space into a cozy home.
For those times when we decide to transform the bedroom into the living room, I thought it would be nice to have some carpet. When I was back in New York, my good friend Tyler Rogers and his family company Carpet Trends hooked us up and made a customer rug to fit in our little space. To date, we haven’t converted the bed to a couch, since we need the bed every night, but once this trip is over I plan to keep the back set up with the couch and look forward to enjoying our carpeted floor!
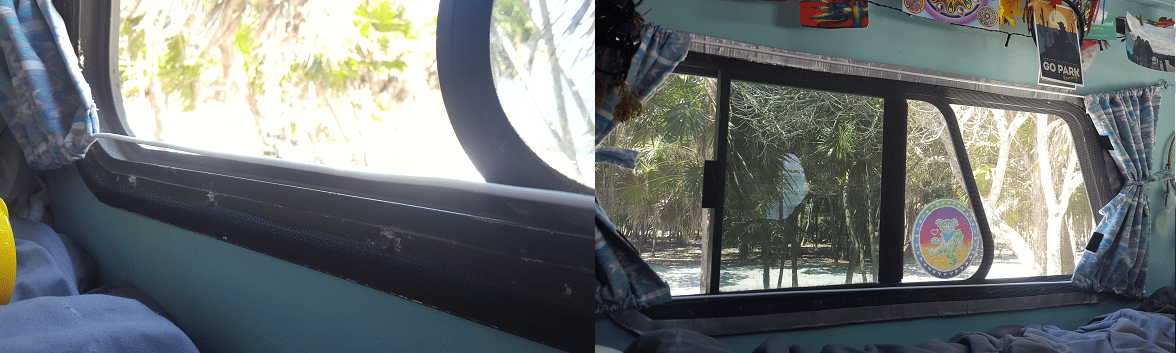
The next important detail was screening. Keeping bugs out is extremely important if you want to relax inside or get a decent night sleep. The windows didn’t come with screening, so I needed to come up with a way to get it done. I bought a roll of screen from home depot along with Velcro and duct tape and began to innovate. The only way to keep bugs out was to screen over the entire window from inside, but by doing that I would cover up the window lock and wouldn’t be able to open and close it. My solution was to use the Velcro so the screen could be removed and put back on easily. Securing Velcro to the window frame was easy, but sticking the other side of the Velcro to the screen proved to be a bit more challenging. I ended up using duct tape to make a frame around the edges of the screen I cut so I would have something to stick the Velcro to, and it worked like a charm.
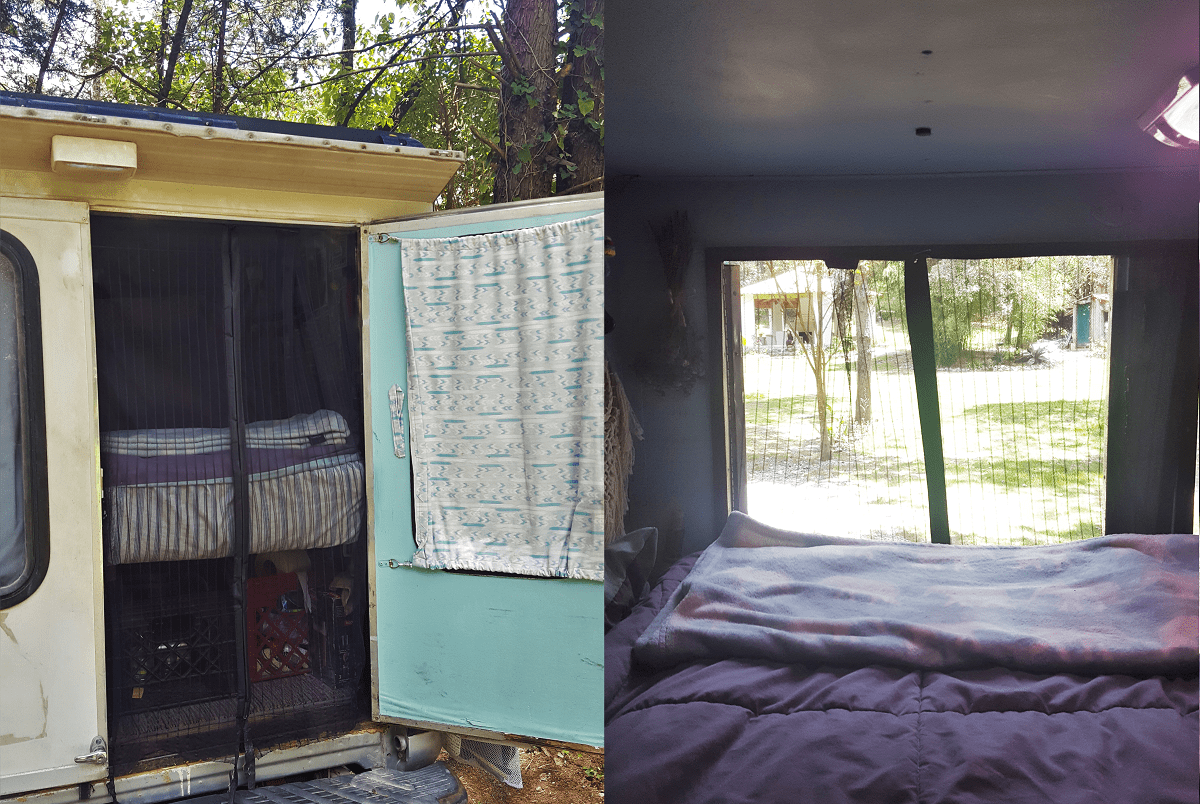
Besides the windows, something had to be done about the back door. The back is two swinging doors that open outward, and we usually keep the left side closed and go in and out the right. Whether the room is set up for the bed or the couch, it’s nice to have the back door open for airflow or simply to take in whatever view we may park ourselves in front of. All I needed to do was install a screen door for the right half, so I picked up one of those magnetic screen doors that Velcro into place, cut it to the proper length, and voilà!
Our little house on wheels has transformed nicely into our comfy home on the road. On top of all the comforts I built into the camper, we have also jam packed all the storage with plenty of stuff to keep us busy. We have a full mobile kitchen complete with a 2-burner stove, pots & pans, seasonings, and all that we need to whip up fantastic meals. In fact, I would be willing to bet we eat better than most people living the “normal” life. Beyond the standard equipment we have for camping out of the truck, we also have a tent and everything we need if we want to ditch the truck for a few days and camp out the old fashion way. So far, we have utilized that stuff 3 times and each time has been an incredible treat. Before leaving San Diego, our good friend Charlotte gave us an inflatable two-person kayak which has been an awesome extra to have on board as well. We have snorkeling gear for the both of us, and I even have my spear fishing equipment with me. So far I have only got to used it a couple times, but when I do get the opportunity it amazing and I love it!
Life on the Road
It’s been a hell of a trip already, with only a few “speed bumps” (or Topes as they call them in Mexico) thus far. We had 2 flat tires as a result from driving on these long and bumpy dirt roads. One I got repaired for 5 bucks, the other needed a new tire, which was a little difficult to find since Poppins has a very unique tire size. Luckily, I was in Playa Del Carmen, a larger city, and was able to find the right size after searching 6 different tire shops.
Beyond that, I did have one incident with the solar panel, also resulting from these damn bumpy dirt roads. We drove for about an hour down this one real choppy road outside of Puerto Escondido, and when we got out, I noticed the panel hanging a bit further over the edge than normal. The adhesive failed in a few spots where the module was glued to the bracket, and in a couple other spots the module stayed glued to the bracket, but the bracket ripped loose from the roof. I guess I should have used a few more Tek screws! I was able to get the module back into place after sealing some of the puncture holes that resulted from the screws getting pulled out. This time around, I was extremely generous with the adhesive, and didn’t skimp on the screws either. Not only did I drill a few screws into the roof for each bracket, but I also decided to forget about the module warranty and drilled a few into the frame. Its gonna take a lot more than a bumpy road to shake that module loose again, that’s for sure.
There have also been some lessons learned about the screens. For the sides, I should have gotten a finer screen, like a mosquito net, instead of the standard screen, because there are some places we go that have bugs so small that they can get through the holes on the standard screening. For now, we just keep the windows closed whenever we sense those tiny annoying bugs. Also, the screen door for the back has been great, but wear and tear is working its way through it. I will need to replace it soon, but that’s fine, because I also cut it too short. Since it’s a little too short, bugs sometimes find their way up through the space on the bottom. Crafty little suckers, I’ll tell ya!
Well, that’s all I got to say about that. I hope you’ve enjoyed getting to know Poppins. If you are taking on a similar project for yourself and have any questions or want some info, feel free to reach out!
Awesome job Poppins is a very Happy and lucky little truck/camper ?
“Well, that’s all I got to say about that.” Ha! What a great post – amazing to learn how everything started falling into place and all he love and hard work you guys put into Poppins. I saw a lot of it happen but didn’t know all the specifics! Good stuff!